
Forttier Booking 1.2.0 - Administrator How-To Guide
Forttier Booking 1.2.0 gives administrators one workflow for availability, appointments, public booking, calendars, client packages, staff and Ecommerce product mapping. This guide explains what each area is for, how it reduces manual work, and the exact action to take.
Watch the complete administrator demo
The following 4-minute video demonstrates the complete workflow with fictional demo data. English narration and burned-in English subtitles are included.
Open or download the lightweight MP4 video · English captions (VTT)
Before you begin
- Sign in with an administrator account that has Booking permissions.
- Confirm that the required services are published and configured with the correct appointment type.
- Confirm that eligible staff, working hours and any required resources are available.
- For paid treatments or packages, confirm that the Ecommerce product is mapped to the correct Booking service.
1. Register a client and issue a session package
Why use it? A single client record prevents duplicate data entry. When a mapped package is purchased, Forttier carries the entitlement into Booking so administrators can schedule the correct service and track the remaining sessions.
- The client registers or signs in.
- They open the treatment, select the required package and choose Buy Now.
- They review the order, choose an available payment method, accept the terms and complete checkout.
- After payment or authorised desk-payment confirmation, Forttier issues the package against the mapped Booking service.
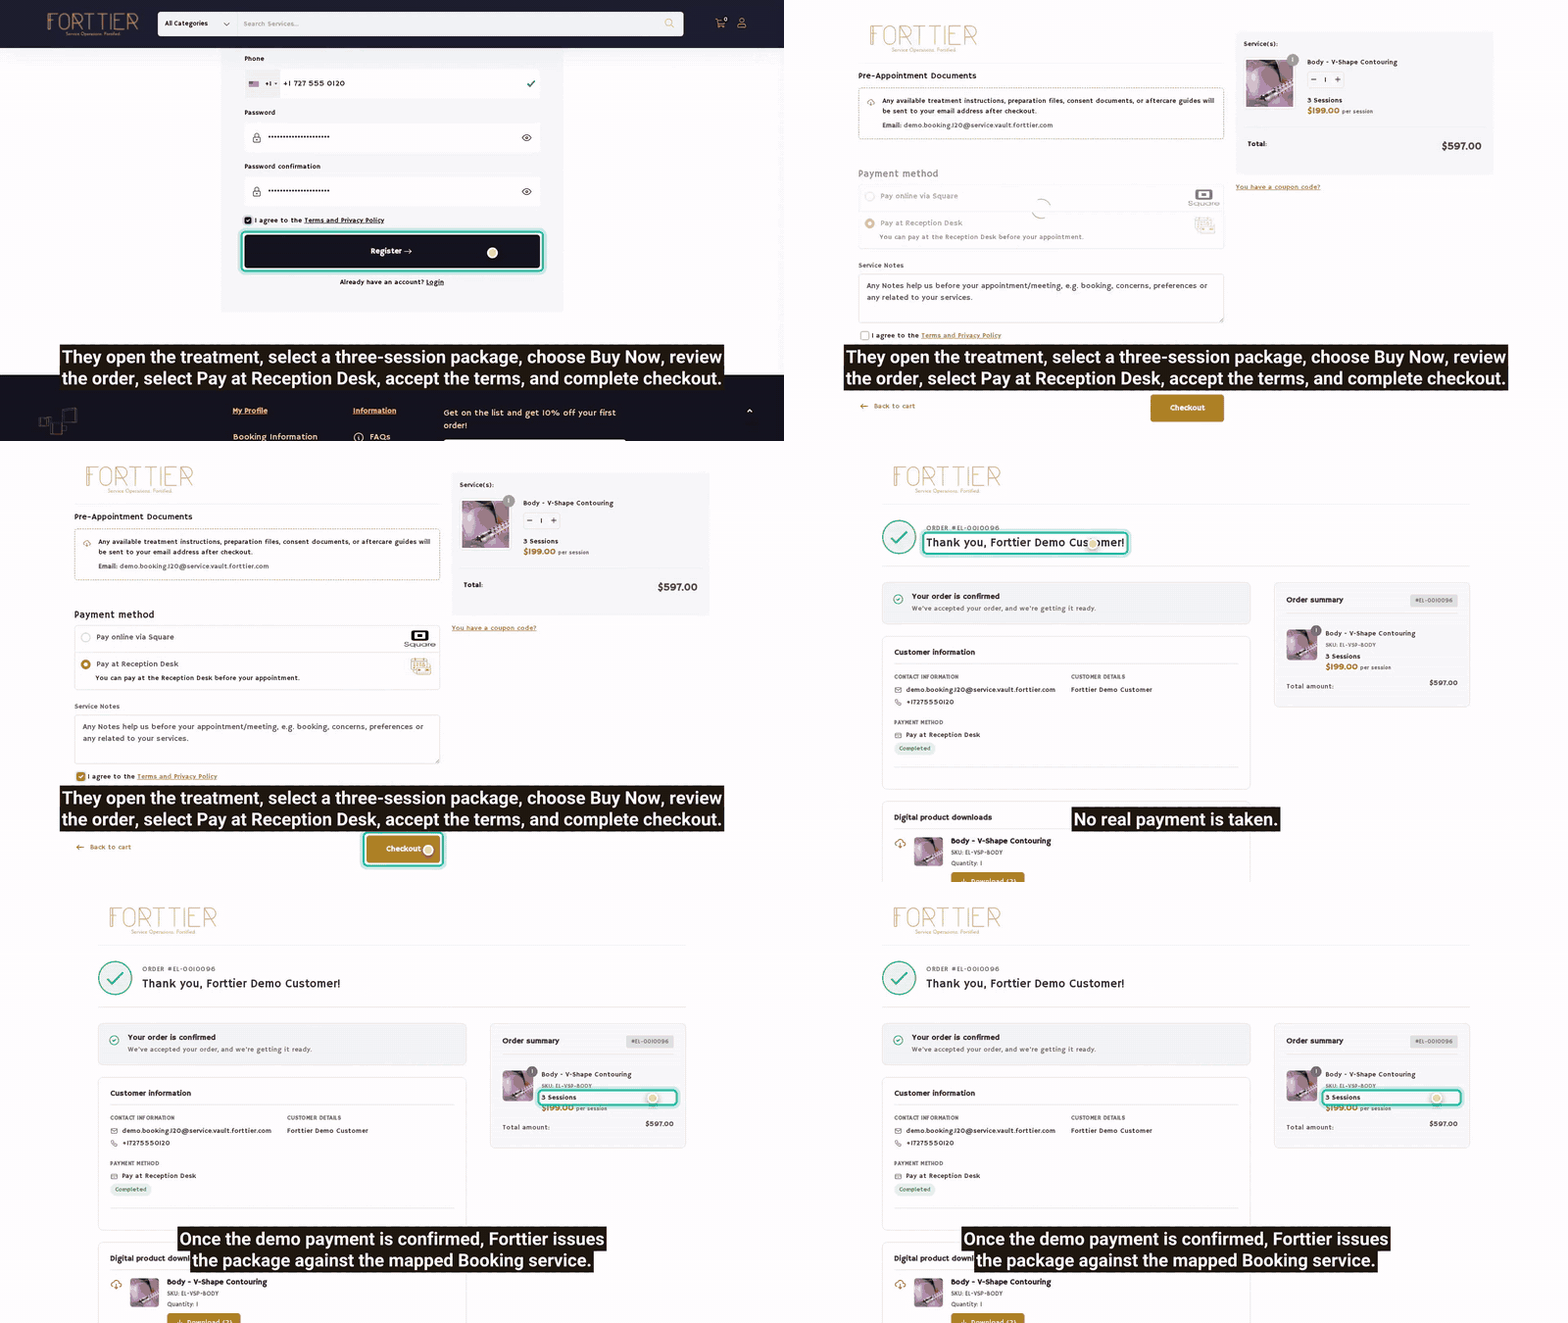
Result: the client package is available in Client Sessions without staff re-entering the purchase.
2. Start the day from Overview
Why use it? Overview brings today’s workload, attention items, weekly capacity and session follow-up into one place.
- Open Bookings → Overview.
- Review today’s bookings and items requiring attention.
- Use the quick actions to add a booking or check availability.
3. Check availability before promising a time
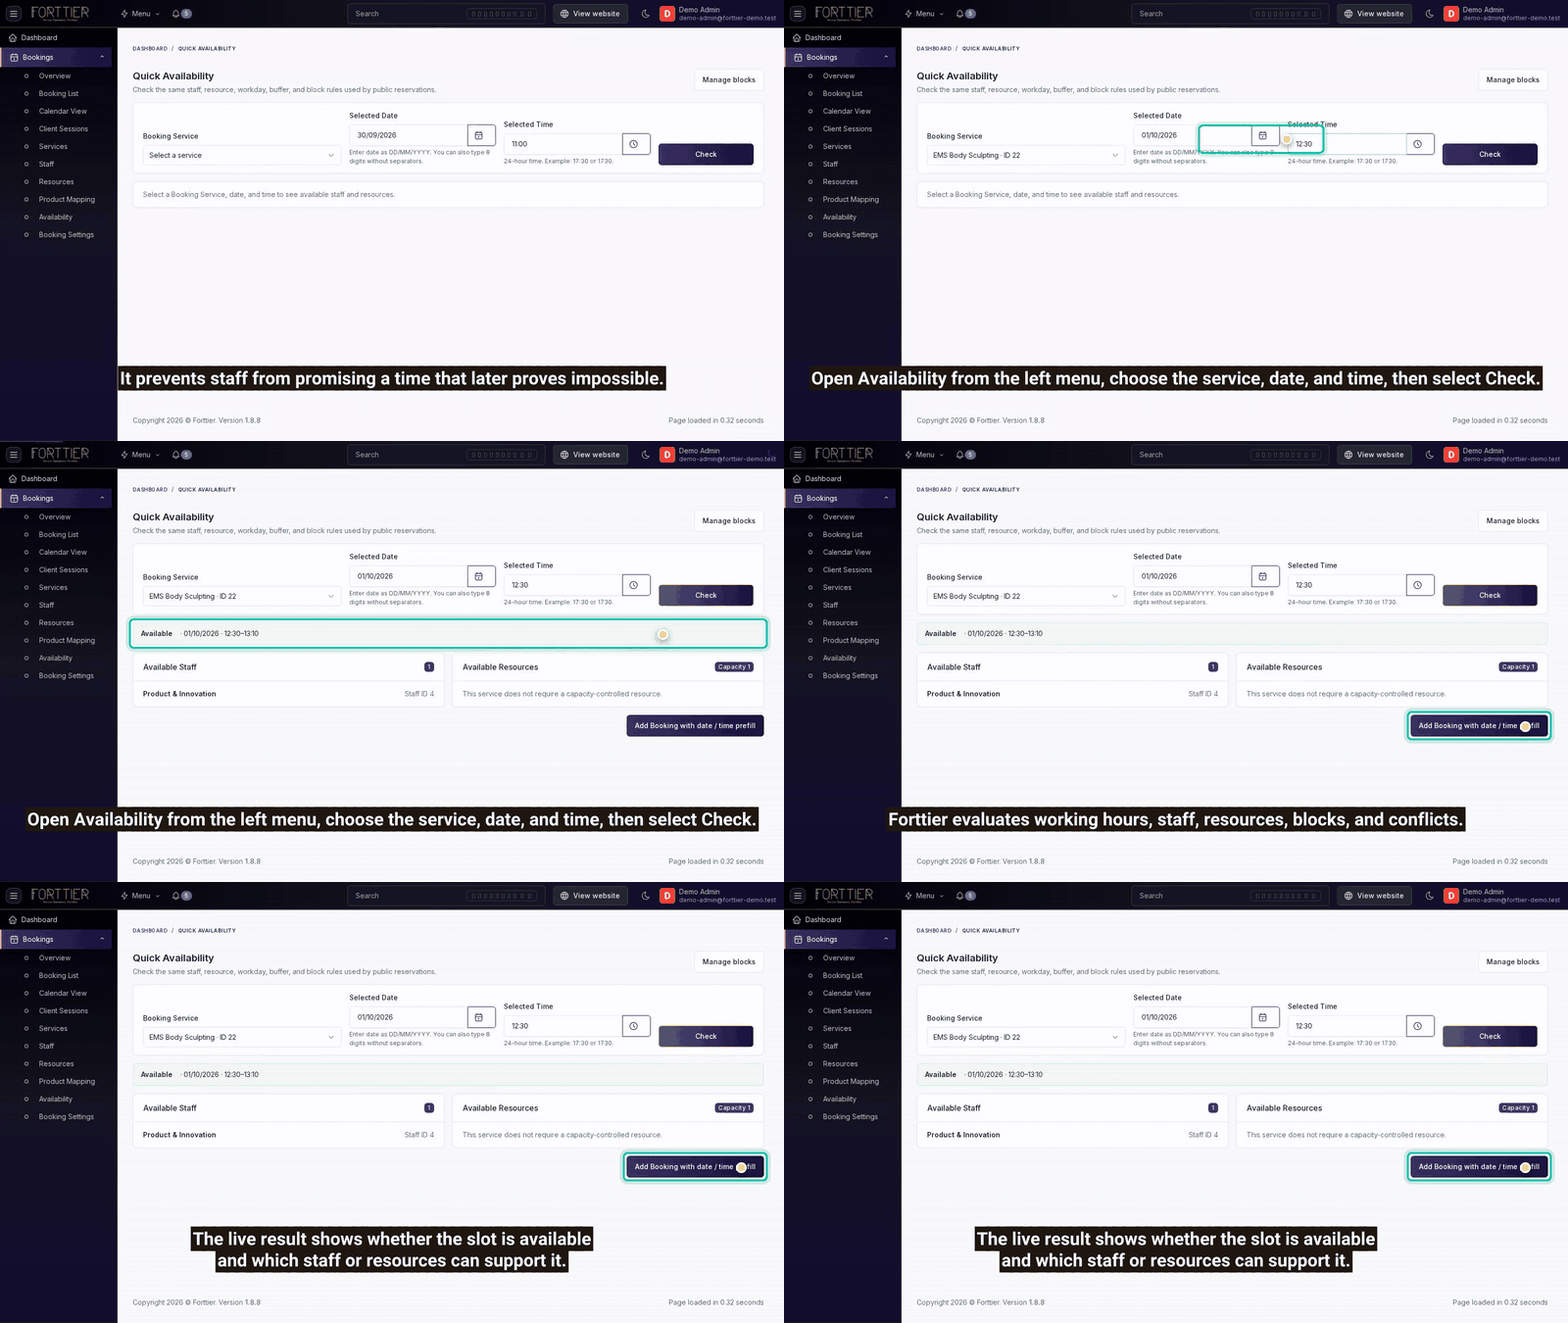
Why use it? Quick Availability checks working hours, staff, resources, blocks and existing conflicts together. This prevents double-booking and avoids offering a time that cannot be delivered.
- Open Bookings → Availability.
- Select the Booking service, date and time.
- Choose Check.
- Review the result and the eligible staff or resources.
- If the slot is available, use Add Booking with date / time prefill.
4. Create and manage a booking
Why use it? Booking List keeps the client, service, assigned staff, appointment time, status and payment state in one controlled record.
- Open Bookings → Booking List.
- Choose Create, or open an existing row with View or Edit.
- Review the client, service, staff, contact details, date, time, appointment type and payment state.
- Save the record and update its status as work progresses.
Use the status consistently: Pending requires review, Confirmed is accepted, Checked in means the client has arrived, Completed records delivery, and Cancelled or No-show closes the appointment with the appropriate outcome.
5. Accept a public booking and review it in admin
Why use it? Public Booking lets a client request a valid time without an administrator copying the details into the system. The new request appears immediately in Booking List for review.
- Open Bookings → Booking Settings.
- Enable Public Booking and the appointment modes your organisation offers.
- For treatment-type services, enable Paid Service and save.
- The client opens the authorised booking link, chooses a valid time, enters their details and submits the request.
- Open Booking List and review the new Pending booking.
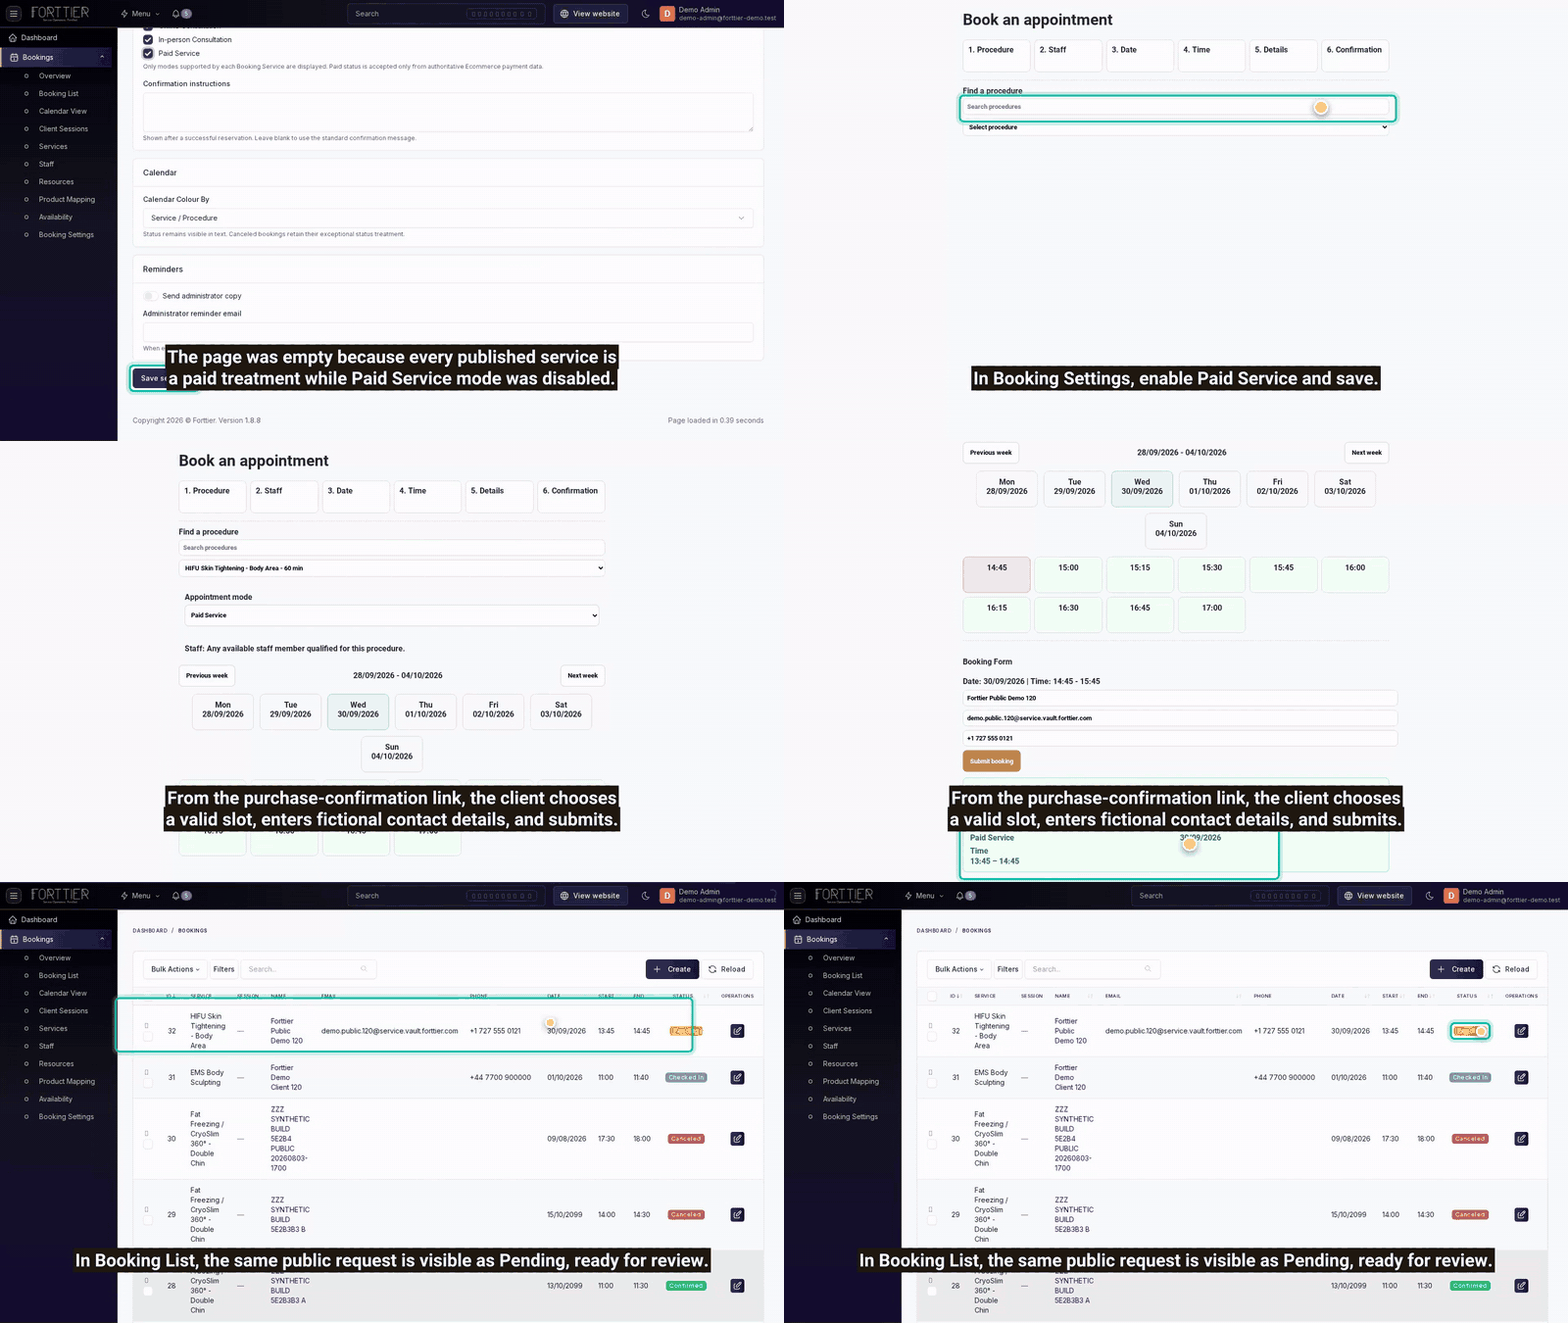
Important: A paid treatment is purchase-gated. The client must reach Booking through the valid Ecommerce purchase-confirmation flow. This prevents an unpaid treatment from being reserved as if it had already been purchased.
6. Plan work in Day, Week and Month views
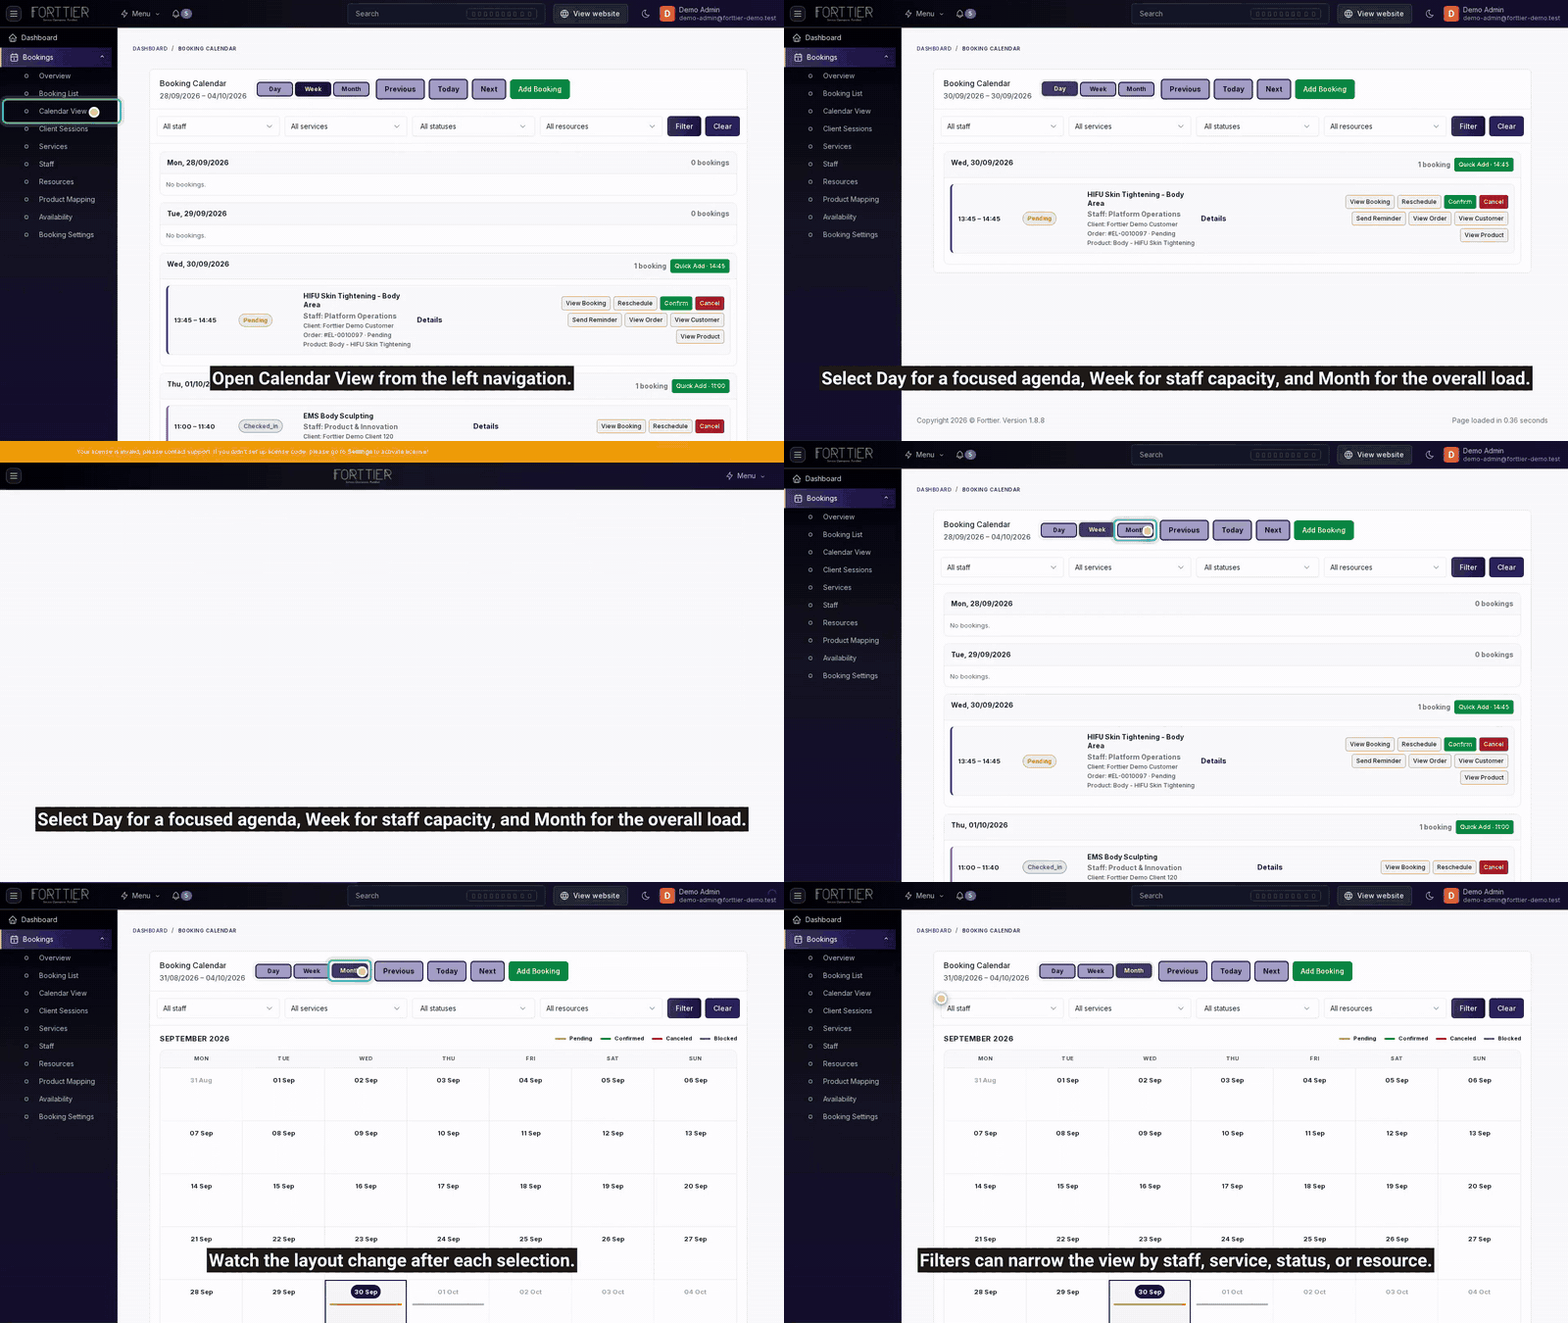
Why use it? Calendar View turns booking records into an operational schedule. Day is useful for a focused agenda, Week for staff capacity, and Month for the overall workload.
- Open Bookings → Calendar View.
- Select Day, Week or Month.
- Use the staff, service, status and resource filters when you need a narrower view.
- Open a booking from the calendar to review or update it.
7. Schedule the next visit from Client Sessions
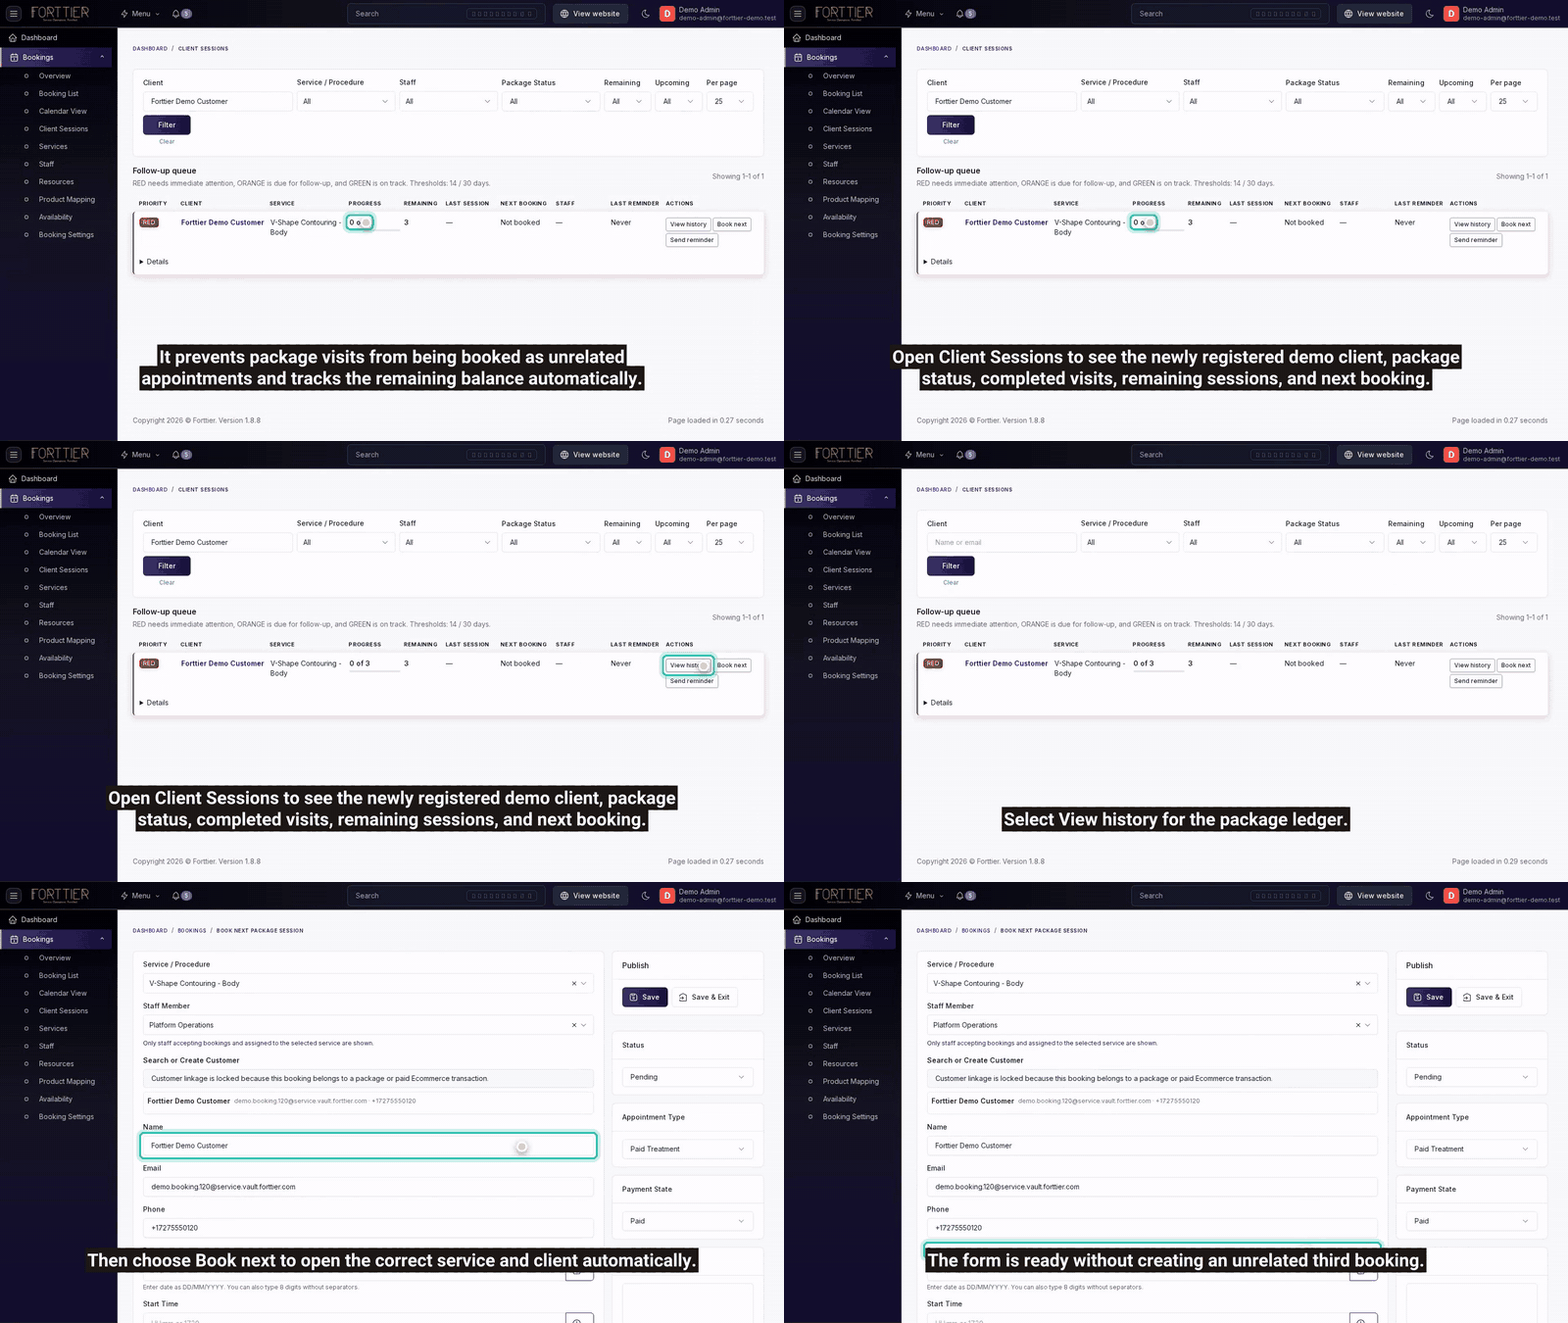
Why use it? Client Sessions protects the package balance and prevents a package visit from being recorded as an unrelated standard booking.
- Open Bookings → Client Sessions.
- Filter by client, service, staff, package status, remaining sessions or upcoming booking.
- Review completed visits, the remaining balance and the next appointment.
- Choose View history to inspect the package ledger.
- Choose Book next to open a booking with the correct client and service already selected.
8. Configure staff and Product Mapping
Staff
Why use it? Staff configuration controls who can be assigned, which services each person can perform and whether they currently accept bookings.
- Open Bookings → Staff.
- Create or edit the staff member.
- Assign the relevant services and confirm Booking Acceptance.
- Save and verify the staff status.
Product Mapping
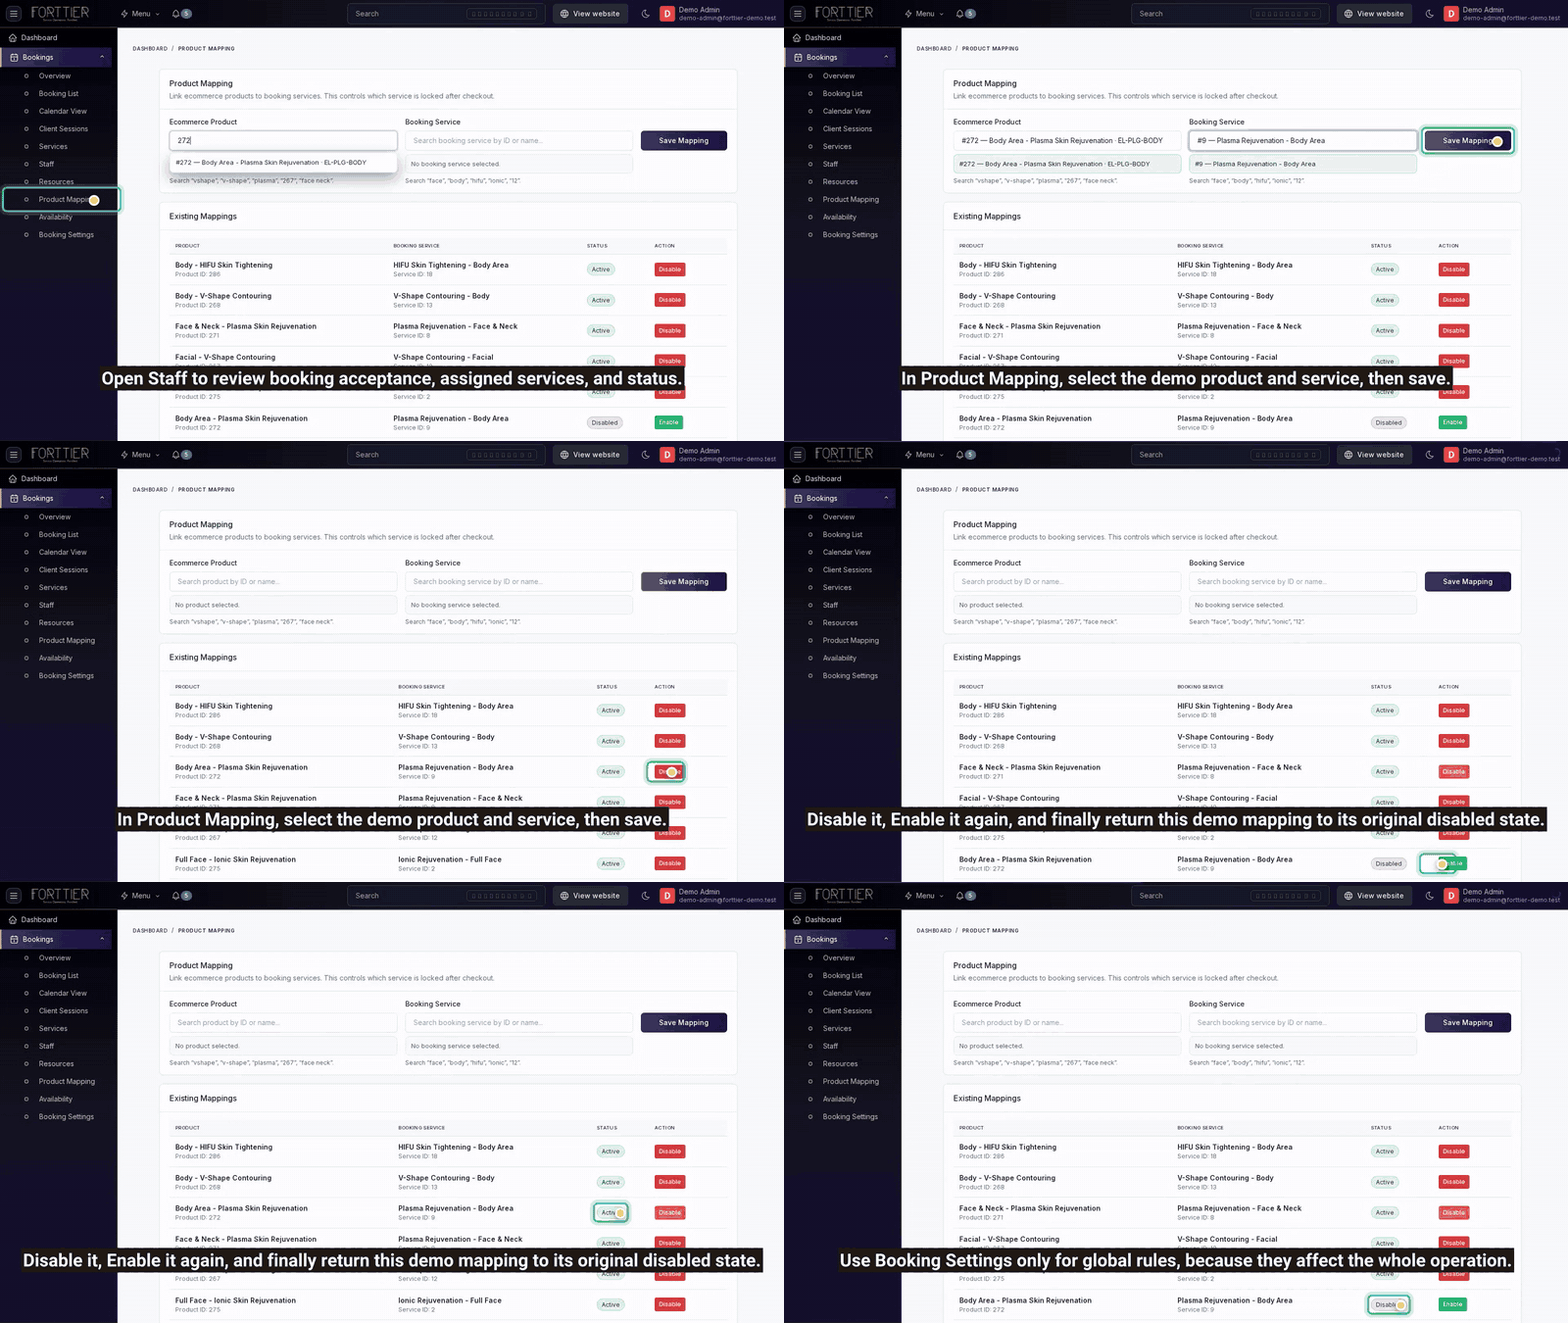
Why use it? Product Mapping connects an Ecommerce purchase to the correct Booking service. It removes manual assignment after checkout and is required for reliable paid-service and package workflows.
- Open Bookings → Product Mapping.
- Search for and select the Ecommerce product.
- Search for and select the matching Booking service.
- Review both selections and choose Save Mapping.
- Use Disable to stop a mapping without deleting it, or Enable to make it active again.
9. Use Booking Settings for global rules
Why use it? Booking Settings controls organisation-wide scheduling and public-booking behaviour. Changes here can affect every service and administrator.
- Scheduling: working days, opening hours, closing hours and slot duration.
- Public Booking: whether public booking is available, whether clients choose staff, and which appointment modes are offered.
- Calendar: colour bookings by service or staff.
- Follow-up: warning and critical thresholds for client sessions.
- Reminders: configure the operational reminder rules used by your installation.
Recommended daily checklist
- Start with Overview.
- Confirm proposed times with Quick Availability.
- Review new public requests in Booking List.
- Update booking statuses as work progresses.
- Check Calendar View for staff and resource capacity.
- Book package visits through Client Sessions.
Troubleshooting
No procedures appear on the public booking page
Check that Public Booking is enabled, the required appointment mode is enabled, the service is published, and eligible staff can accept that service. Treatment-type services require Paid Service mode.
Quick Availability reports that a time is unavailable
Read the reason shown on screen. Check working hours, blocked periods, staff conflicts and resource capacity before changing the booking.
A purchased package is missing from Client Sessions
Confirm that the Ecommerce product was mapped to the correct Booking service and that the mapping was active when the authorised purchase was completed.
A booking is missing from Calendar View
Confirm the selected date range and clear staff, service, status or resource filters that may be hiding the record.
If the issue continues, submit a support ticket with the booking reference, service name, relevant date and a screenshot of the result. Do not include passwords, payment-card information or unnecessary personal data.